


G-gen の武井です。当記事では Cloud Build を使って Terraform 実行を自動化する方法を紹介します。

はじめに
当記事の概要
GitHub の任意のブランチへのプッシュを契機に Terraform を実行する CI/CD パイプラインを、GitHub と Code Build のみで実装することができます。
当記事ではその手順についてご紹介します。
前提知識
GitHub
GitHub とは、開発者がコードを共有、管理、コラボレーションするためのプラットフォームです。
Git ベースのバージョン管理システムに加え、問題追跡、機能リクエスト、タスク管理、コミュニティ構築などのツールも提供しています。
Terraform
Terraform とは、HashiCorp 社が開発したオープンソースの Infrastructure as Code (IaC) ツールです。
Terraform では、独自フォーマットの設定ファイルに宣言型のコードを記述することで、仮想マシン、ストレージ、ネットワーク等の各種リソースを管理できます。また、作成した各種リソースの状態 (state) についてもファイルとして保存されるため、実環境と設定ファイルの差分が把握できます。
ファイルでクラウドリソースを管理できるため、 バージョン管理や CI/CD (継続的インテグレーション / 継続的デリバリ) を可能にします。また、Google Cloud (旧称 GCP) だけでなく Amazon Web Services (AWS) や Microsoft Azure といった主要なパブリッククラウドにも対応しています。
Cloud Build
Cloud Build とは、Google Cloud のフルマネージドなサーバレス CI/CD(継続的インテグレーション / 継続的デリバリー)プラットフォームです。
開発者はソースコードからインフラやアプリケーションを高速かつ確実にビルド、テスト、デプロイすることができ、効率的な開発ライフサイクルの実現をサポートします。
Cloud Build トリガー
Cloud Build トリガー とはビルドプロセスを自動的に起動させる機能です。
例えば任意のブランチにプッシュやプルリクエストといったイベントが発生した際、それをトリガーに予め定義したビルドプロセスを自動的に実行します。
ビルドプロセスは YAML または JSON 形式のビルド構成ファイルで定義します。
Terraform / Cloud Build 詳細
Terraform や Cloud Build に関する詳細は以下の記事で解説しております。
こちらも合わせて参照ください。
アーキテクチャ
今回の例ではリポジトリに GitHub を使用し、任意のブランチへのプッシュイベントをトリガーに Terraform が動作します。
- ローカル側で切り出した
devブランチをリモート側にプッシュする terraform planが自動実行mainブランチにマージするterraform applyが自動実行
詳細は後述しますが、terraform apply コマンドは main ブランチにマージされた場合にのみ実行されるようにしています。
これは、任意のブランチ (図の例では dev) にプッシュされたソースコードや terraform plan の実行結果がきちんとレビューされたあとに実行されることを意図しているからです。

設定手順
GitHub リポジトリとの連携
まず Terraform のソースコードを管理する GitHub リポジトリとの連携を行います。手順は以下の公式ガイドを参考にしています。
参考 : GitHub リポジトリを接続する
手順
Cloud コンソール > Cloud Build トリガーと遷移し、任意のリージョンを選択したらリポジトリを接続をクリックします。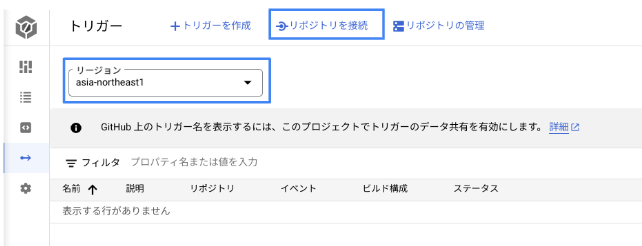
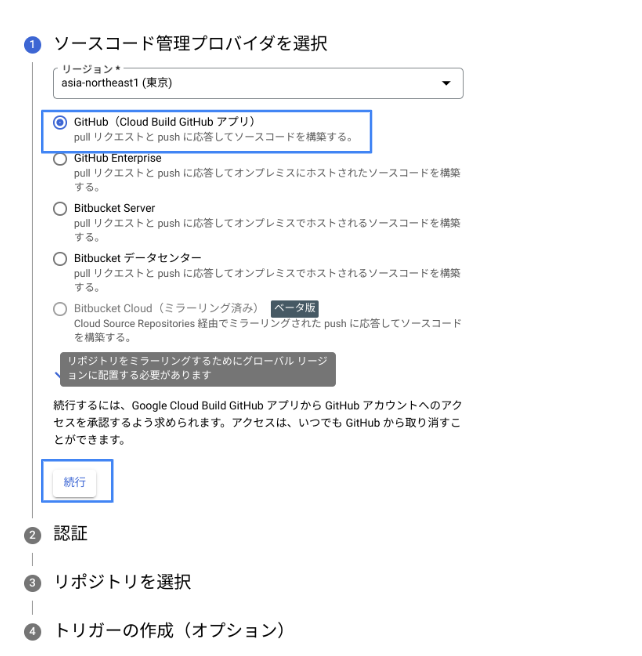
リポジトリを接続 をクリック GitHub (Cloud Build GitHub アプリ)を選択し、続行をクリックします。
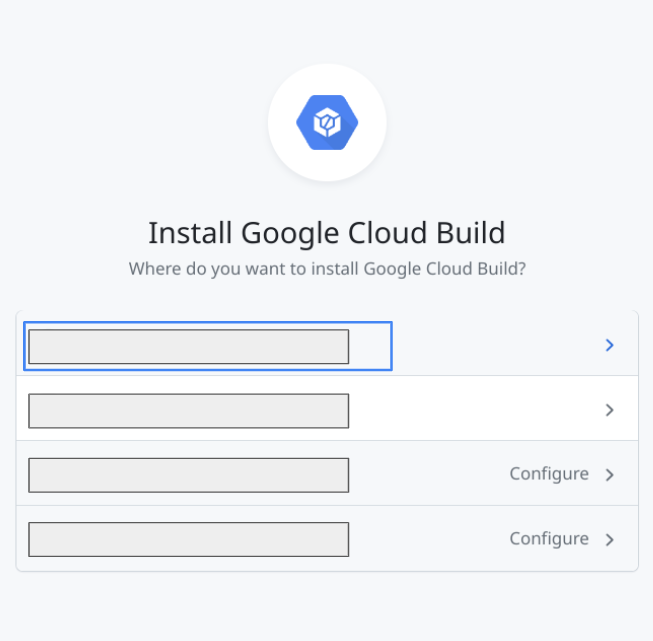
GitHub (Cloud Build GitHub アプリ) を選択 - Cloud Build GitHub アプリのインストール先となる
組織またはGitHub ユーザー名を選択します。
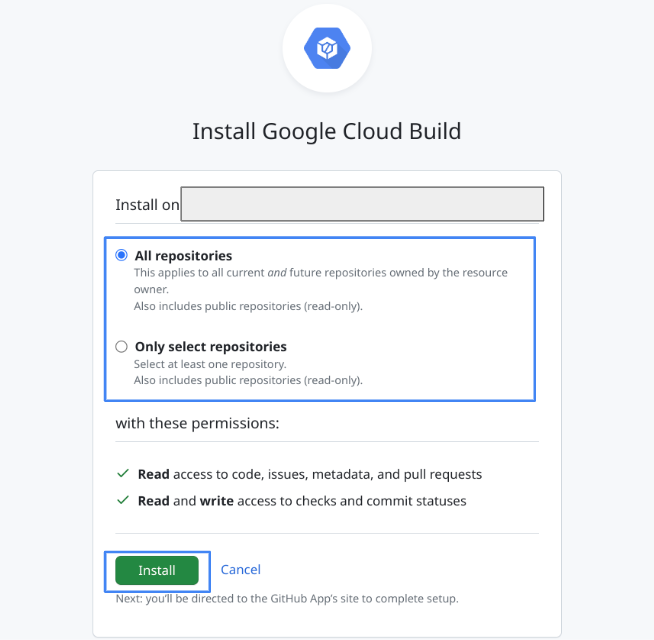
アプリのインストール先を選択 All repositories (すべての GitHub リポジトリ)あるいはOnly select repositories (特定の GitHub リポジトリ)かを選択したのち、Installをクリックします。
連携対象のリポジトリを選択 - GitHub ユーザーアカウントに MFA 認証が設定されている場合は認証コードを入力します。

認証コードを入力 (MFA 認証が有効な場合) GitHub アカウントとリポジトリの選択、利用規約への同意 (チェックボックス) が完了したら、最後に接続をクリックします。
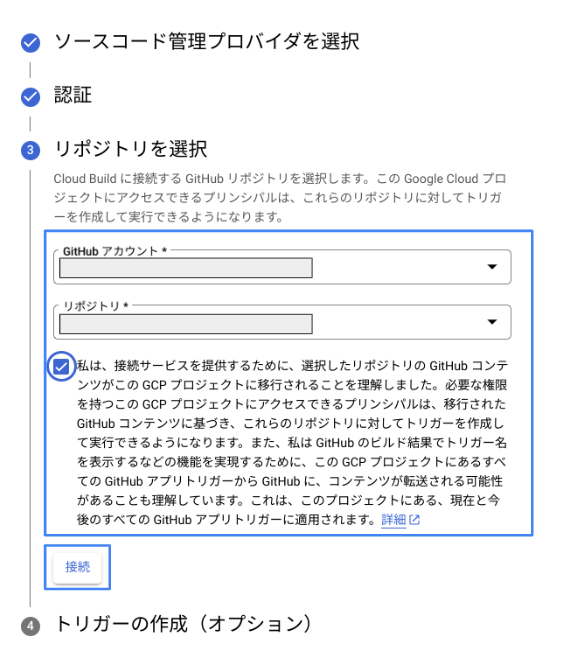
対象のリポジトリを選択したら接続 - サンプルトリガーは作成せずに
完了をクリックします。

サンプルトリガーは作成せずに完了する
Cloud Build トリガーの作成
次に Cloud Build トリガーを作成します。今回 Cloud Build トリガーの作成には gcloud コマンドを使用します。
参考 : gcloud beta builds triggers create github
参考 : ビルドトリガーの作成
gcloud beta builds triggers create github \
--name="push-trigger-terraform" \
--region="asia-northeast1" \
--repo-name="sample-repo-name" \
--repo-owner="sample-repo-owner-name" \
--branch-pattern=".*" \
--included-files="sample/modules/**" \
--build-config="sample/terraform.yaml" \
--substitutions="_WORK_DIR"="sample/"
コマンド解説
上記コマンドを実際の成果物 (Cloud Build トリガー) に照らし合わせて解説します。
Cloud コンソール > Cloud Build > トリガー から確認可能です。
- トリガー名とリージョン
--nameと--regionオプションで指定した値で作成されます。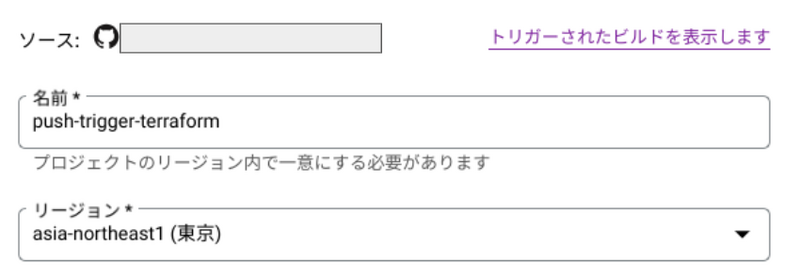
トリガー名とリージョン - イベント
プッシュイベントをトリガーとする場合、コマンドオプションでの指定は不要です。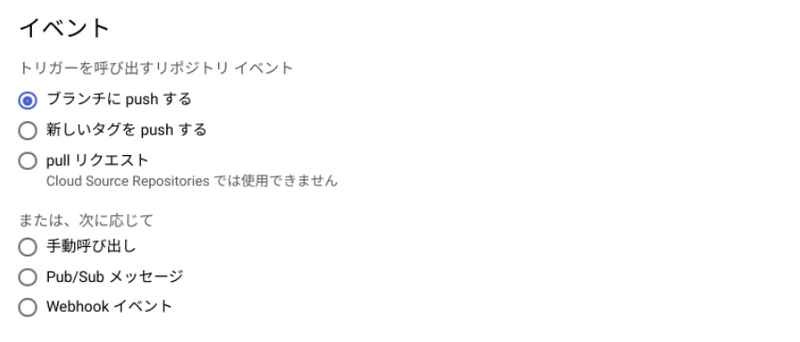
イベントのデフォルトはプッシュイベント - リポジトリ
--repo-nameと--repo-ownerは GitHub リポジトリの URL に記載されている値を入力します。
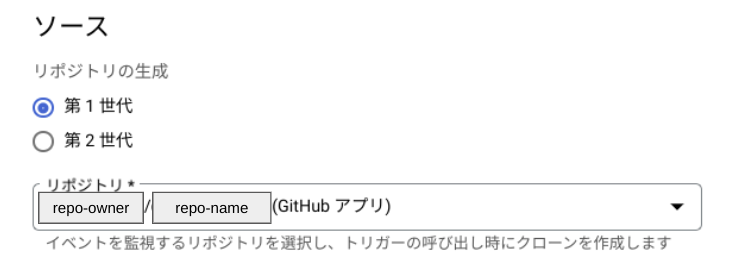
repo-name と repo-owner は GitHub リポジトリの URL から確認可能 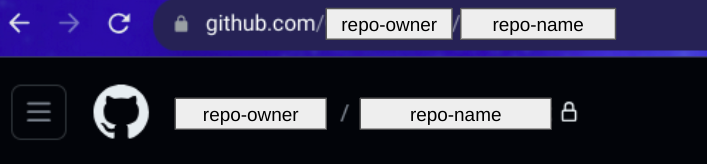
GitHub リポジトリの URL - ブランチ名とビルド構成ファイル
--branch-patternでプッシュ先のブランチを指定しますが、ビルド構成ファイルで制御したいためこちらの設定値は任意 (.*) としています。
また、--included-filesでsample/modulesディレクトリ配下のファイル更新に関するプッシュイベントをターゲットにしています。(ファイル構成は後述)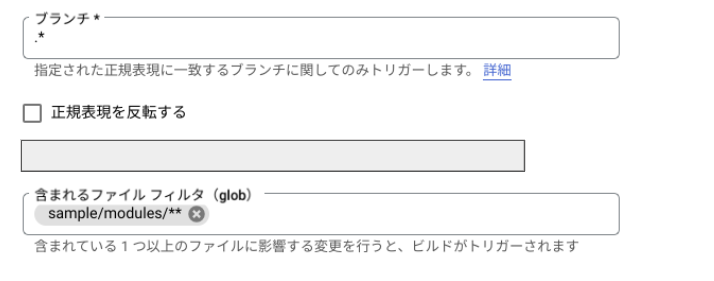
プッシュ先ブランチはビルド構成ファイルで制御するため、トリガー設定上は任意とする - ビルド構成ファイル
--build-configでビルド構成ファイルのパスをルートディレクトリを起点に明示します。(ファイル構成は後述)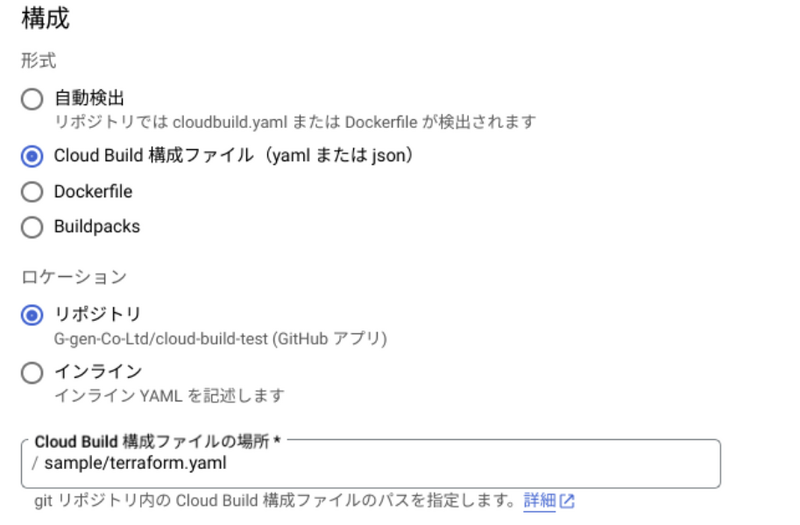
ビルド構成ファイルのパスを指定 - 変数
ビルド構成ファイルで使用する変数を--substitutionsで指定します。
変数 (_WORK_DIR) は Terraform コマンドを実行するディレクトリ (sample/) を定義しています。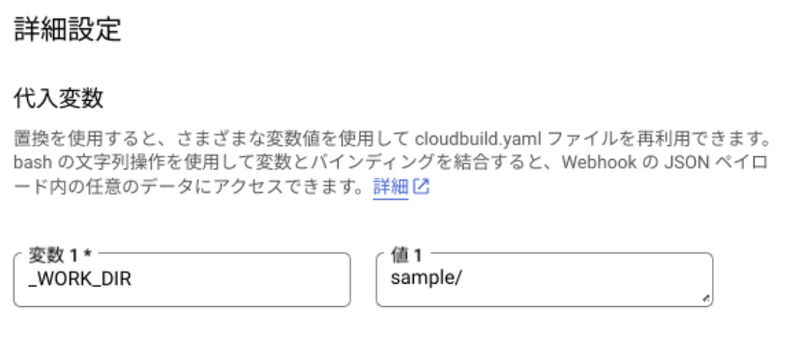
ビルド構成ファイルで使用する変数の定義
ソースコードの作成
Terraform のソースコードは GitHub に用意します。コードの編集にはコードスペースを使用しており、/workspaces/sample-repo-name がルートディレクトリに相当します。
@username ➜ /workspaces/sample-repo-name (dev) $ pwd
/workspaces/sample-repo-name
@username ➜ /workspaces/sample-repo-name (dev) $ tree
.
├── sample
│   ├── modules
│   │   └── cloud_storage
│   │       ├── main.tf
│   │       └── variables.tf
│   ├── backend.tf
│   ├── main.tf
│   ├── terraform.tfvars
│   ├── terraform.yaml
│   ├── variables.tf
│   └── versions.tf
Terraform ソースコード
以下の Terraform ソースコードを使ってストレージバケットを払い出します。
sample/modules/cloud_storage/main.tf
locals {
  names = [
    "cicd-testbucket-01",
  ]
}

resource "google_storage_bucket" "buckets" {
  for_each = toset(local.names)

  name          = each.value
  storage_class = "STANDARD"
  project       = var.project_id
  location      = var.region
  uniform_bucket_level_access = true
}
sample/modules/cloud_storage/variables.tf (sample/variables.tf も同じ)
variable "project_id" {
  type = string
}

variable "region" {
  type = string
}
sample/backend.tf
terraform {
  backend "gcs" {
    bucket = "sample-project-tfstate-bucket"
    prefix = "terraform/state"
  }
}
sample/main.tf
module "cicd_test" {
  source  = "./modules/cloud_storage"
  project_id = var.project_id
  region  = var.region
}
sample/terraform.tfvars
project_id = "sample-project"
region = "asia-northeast1"
sample/versions.tf
provider "google" {
  project = var.project_id
}

terraform {
  required_version = "~> 1.5.0"

  required_providers {
    google = {
      source  = "hashicorp/google"
      version = "~> 4.65.2"
    }
  }
}
ビルド構成ファイル
ビルド構成ファイル (sample/terraform.yaml) では以下の処理を定義しています。
- 実行される処理は
terraform init / terraform plan / terraform applyの 3つ - 各処理は
_WORK_DIR変数で定義したsample/ディレクトリ上で実行される - プッシュ先ブランチが
main以外の場合、terraform planまでの処理が実行され、最後にechoで定義したメッセージ (terraform applyがスキップされた旨) を表示して終了する - マージ先ブランチが
mainの場合、terraform applyまでの処理が実行される
steps:
  - id: "tf init"
    name: "hashicorp/terraform:1.5.0"
    dir: "$_WORK_DIR"
    entrypoint: "sh"
    args:
      - "-c"
      - |
        terraform init -upgrade || exit 1

  - id: "tf plan"
    name: "hashicorp/terraform:1.5.0"
    dir: "$_WORK_DIR"
    entrypoint: "sh"
    args:
      - "-c"
      - |
        terraform plan || exit 1

  - id: "tf apply"
    name: "hashicorp/terraform:1.5.0"
    dir: "$_WORK_DIR"
    entrypoint: "sh"
    args:
      - "-c"
      - |
        if [ "$BRANCH_NAME" = "main" ]; then
          terraform apply -auto-approve
        else
          echo "***************************************************************************************"
          echo "terraform apply was skipped because it's not a merge into the main branch."
          echo "***************************************************************************************"
        fi
動作確認
dev ブランチへのプッシュ、main ブランチへのマージでそれぞれの処理が意図通り実行されるかを確認します。
dev ブランチへのプッシュ
コードスペース (ローカル) 上に main ブランチをクローンした後に dev ブランチを切り、上記で説明したソースコード一式を作成したらリモートにプッシュします。
以下はその際のコマンド操作履歴です。
@username ➜ /workspaces/sample-repo-name (dev) $ history
    1  git checkout -b dev
    2  git add .
    3  git commit -m "add storage bucket"
    4  git push --set-upstream origin dev
GitHub (リモート側) にソースコードがプッシュされた旨が表示されました。

次に、Cloud コンソール > Cloud Build > 履歴 から Cloud Build の実行履歴を確認します。一覧上のステータスが 成功 になっていますので ビルド ID をクリックして詳細を確認します。

各処理が成功しており、ログ出力からも意図通り動作していることがわかります。
terraform planが実行され、ストレージバケットが払い出される旨が表示mainブランチへのマージではないので、terraform applyはスキップ

# ログ出力 (重要な部分のみ抜粋)

starting build "294c2437-edcb-405c-9b5c-646e23de2fb5"

Starting Step #0 - "tf init"
Step #0 - "tf init":
Step #0 - "tf init": Initializing the backend...
Step #0 - "tf init":
Step #0 - "tf init": Successfully configured the backend "gcs"! Terraform will automatically
Step #0 - "tf init": use this backend unless the backend configuration changes.
Step #0 - "tf init": Upgrading modules...
Step #0 - "tf init": - cicd_test in modules/cloud_storage
Step #0 - "tf init":
Step #0 - "tf init": Initializing provider plugins...
Step #0 - "tf init": - Finding hashicorp/google versions matching "~> 4.65.2"...
Step #0 - "tf init": - Installing hashicorp/google v4.65.2...
Step #0 - "tf init": - Installed hashicorp/google v4.65.2 (signed by HashiCorp)
Step #0 - "tf init":
Step #0 - "tf init": Terraform has been successfully initialized!
Step #0 - "tf init":
Step #0 - "tf init": You may now begin working with Terraform. Try running "terraform plan" to see
Step #0 - "tf init": any changes that are required for your infrastructure. All Terraform commands
Step #0 - "tf init": should now work.
Step #0 - "tf init":
Step #0 - "tf init": If you ever set or change modules or backend configuration for Terraform,
Step #0 - "tf init": rerun this command to reinitialize your working directory. If you forget, other
Step #0 - "tf init": commands will detect it and remind you to do so if necessary.
Finished Step #0 - "tf init"
Starting Step #1 - "tf plan"
Step #1 - "tf plan": Already have image: hashicorp/terraform:1.5.0
Step #1 - "tf plan":
Step #1 - "tf plan": Terraform used the selected providers to generate the following execution
Step #1 - "tf plan": plan. Resource actions are indicated with the following symbols:
Step #1 - "tf plan":   + create
Step #1 - "tf plan":
Step #1 - "tf plan": Terraform will perform the following actions:
Step #1 - "tf plan":
Step #1 - "tf plan":   # module.cicd_test.google_storage_bucket.buckets["cicd-testbucket-01"] will be created
Step #1 - "tf plan":   + resource "google_storage_bucket" "buckets" {
Step #1 - "tf plan":       + force_destroy               = false
Step #1 - "tf plan":       + id                          = (known after apply)
Step #1 - "tf plan":       + location                    = "ASIA-NORTHEAST1"
Step #1 - "tf plan":       + name                        = "cicd-testbucket-01"
Step #1 - "tf plan":       + project                     = "sample-project"
Step #1 - "tf plan":       + public_access_prevention    = (known after apply)
Step #1 - "tf plan":       + self_link                   = (known after apply)
Step #1 - "tf plan":       + storage_class               = "STANDARD"
Step #1 - "tf plan":       + uniform_bucket_level_access = true
Step #1 - "tf plan":       + url                         = (known after apply)
Step #1 - "tf plan":     }
Step #1 - "tf plan":
Step #1 - "tf plan": Plan: 1 to add, 0 to change, 0 to destroy.
Step #1 - "tf plan":
Step #1 - "tf plan": ─────────────────────────────────────────────────────────────────────────────
Step #1 - "tf plan":
Step #1 - "tf plan": Note: You didn't use the -out option to save this plan, so Terraform can't
Step #1 - "tf plan": guarantee to take exactly these actions if you run "terraform apply" now.
Finished Step #1 - "tf plan"
Starting Step #2 - "tf apply"
Step #2 - "tf apply": Already have image: hashicorp/terraform:1.5.0
Step #2 - "tf apply": ***************************************************************************************
Step #2 - "tf apply": terraform apply was skipped because it's not a merge into the main branch.
Step #2 - "tf apply": ***************************************************************************************
Finished Step #2 - "tf apply"
PUSH
DONE
main ブランチへマージ
dev ブランチへのプッシュ (terraform plan の実行結果) は想定通りでしたので、次に main ブランチにマージ (プッシュ) します。

先程同様ビルド履歴を確認します。main ブランチへのマージとなるため、今回のビルドでは terraform apply まで実行されていることがわかります。
# ログ出力 (重要な部分のみ抜粋)

starting build "625f1b9e-0446-4c07-93ef-efaa11ec5310"


Starting Step #0 - "tf init"
Step #0 - "tf init": Initializing the backend...
Step #0 - "tf init":
Step #0 - "tf init": Successfully configured the backend "gcs"! Terraform will automatically
Step #0 - "tf init": use this backend unless the backend configuration changes.
Step #0 - "tf init": Upgrading modules...
Step #0 - "tf init": - cicd_test in modules/cloud_storage
Step #0 - "tf init":
Step #0 - "tf init": Initializing provider plugins...
Step #0 - "tf init": - Finding hashicorp/google versions matching "~> 4.65.2"...
Step #0 - "tf init": - Installing hashicorp/google v4.65.2...
Step #0 - "tf init": - Installed hashicorp/google v4.65.2 (signed by HashiCorp)
Step #0 - "tf init":
Step #0 - "tf init": Terraform has been successfully initialized!
Step #0 - "tf init":
Step #0 - "tf init": You may now begin working with Terraform. Try running "terraform plan" to see
Step #0 - "tf init": any changes that are required for your infrastructure. All Terraform commands
Step #0 - "tf init": should now work.
Step #0 - "tf init":
Step #0 - "tf init": If you ever set or change modules or backend configuration for Terraform,
Step #0 - "tf init": rerun this command to reinitialize your working directory. If you forget, other
Step #0 - "tf init": commands will detect it and remind you to do so if necessary.
Finished Step #0 - "tf init"
Starting Step #1 - "tf plan"
Step #1 - "tf plan": Already have image: hashicorp/terraform:1.5.0
Step #1 - "tf plan":
Step #1 - "tf plan": Terraform used the selected providers to generate the following execution
Step #1 - "tf plan": plan. Resource actions are indicated with the following symbols:
Step #1 - "tf plan":   + create
Step #1 - "tf plan":
Step #1 - "tf plan": Terraform will perform the following actions:
Step #1 - "tf plan":
Step #1 - "tf plan":   # module.cicd_test.google_storage_bucket.buckets["cicd-testbucket-01"] will be created
Step #1 - "tf plan":   + resource "google_storage_bucket" "buckets" {
Step #1 - "tf plan":       + force_destroy               = false
Step #1 - "tf plan":       + id                          = (known after apply)
Step #1 - "tf plan":       + location                    = "ASIA-NORTHEAST1"
Step #1 - "tf plan":       + name                        = "cicd-testbucket-01"
Step #1 - "tf plan":       + project                     = "sample-project"
Step #1 - "tf plan":       + public_access_prevention    = (known after apply)
Step #1 - "tf plan":       + self_link                   = (known after apply)
Step #1 - "tf plan":       + storage_class               = "STANDARD"
Step #1 - "tf plan":       + uniform_bucket_level_access = true
Step #1 - "tf plan":       + url                         = (known after apply)
Step #1 - "tf plan":     }
Step #1 - "tf plan":
Step #1 - "tf plan": Plan: 1 to add, 0 to change, 0 to destroy.
Step #1 - "tf plan":
Step #1 - "tf plan": ─────────────────────────────────────────────────────────────────────────────
Step #1 - "tf plan":
Step #1 - "tf plan": Note: You didn't use the -out option to save this plan, so Terraform can't
Step #1 - "tf plan": guarantee to take exactly these actions if you run "terraform apply" now.
Finished Step #1 - "tf plan"
Starting Step #2 - "tf apply"
Step #2 - "tf apply": Already have image: hashicorp/terraform:1.5.0
Step #2 - "tf apply":
Step #2 - "tf apply": Terraform used the selected providers to generate the following execution
Step #2 - "tf apply": plan. Resource actions are indicated with the following symbols:
Step #2 - "tf apply":   + create
Step #2 - "tf apply":
Step #2 - "tf apply": Terraform will perform the following actions:
Step #2 - "tf apply":
Step #2 - "tf apply":   # module.cicd_test.google_storage_bucket.buckets["cicd-testbucket-01"] will be created
Step #2 - "tf apply":   + resource "google_storage_bucket" "buckets" {
Step #2 - "tf apply":       + force_destroy               = false
Step #2 - "tf apply":       + id                          = (known after apply)
Step #2 - "tf apply":       + location                    = "ASIA-NORTHEAST1"
Step #2 - "tf apply":       + name                        = "cicd-testbucket-01"
Step #2 - "tf apply":       + project                     = "sample-project"
Step #2 - "tf apply":       + public_access_prevention    = (known after apply)
Step #2 - "tf apply":       + self_link                   = (known after apply)
Step #2 - "tf apply":       + storage_class               = "STANDARD"
Step #2 - "tf apply":       + uniform_bucket_level_access = true
Step #2 - "tf apply":       + url                         = (known after apply)
Step #2 - "tf apply":     }
Step #2 - "tf apply":
Step #2 - "tf apply": Plan: 1 to add, 0 to change, 0 to destroy.
Step #2 - "tf apply": module.cicd_test.google_storage_bucket.buckets["cicd-testbucket-01"]: Creating...
Step #2 - "tf apply": module.cicd_test.google_storage_bucket.buckets["cicd-testbucket-01"]: Creation complete after 2s [id=cicd-testbucket-01]
Step #2 - "tf apply":
Step #2 - "tf apply": Apply complete! Resources: 1 added, 0 changed, 0 destroyed.
Finished Step #2 - "tf apply"
PUSH
DONE
Step #2 - "tf apply":
Cloud コンソール上でもストレージバケットが作成されています。

関連記事
過去の記事では GitHub Actions を用いて今回同様のアーキテクチャの実装方法もご紹介していますのでこちらも是非ご参照ください。
武井 祐介 (記事一覧)
クラウドソリューション部所属。G-gen唯一の山梨県在住エンジニア
Google Cloud Partner Top Engineer 2025 選出。IaC や CI/CD 周りのサービスやプロダクトが興味分野です。
趣味はロードバイク、ロードレースやサッカー観戦です。
Follow @ggenyutakei