


G-gen の大津です。当記事では、Google が提供する画像生成 AI モデル Imagen と、Web UI 用の Python フレームワークである Gradio を使用した、シンプルな画像生成 Web アプリの開発手順を紹介します。
はじめに
Imagen
Imagen は、Google が提供する画像生成 AI モデルです。Imagen は、Google Cloud の AI/ML 統合開発ツールである Vertex AI 経由で利用可能です。Vertex AI の Web コンソールや REST API 経由でテキストプロンプトを渡すことで、画像を生成することができます。
Imagen では以下のことが可能です。
- テキストから新しい画像を生成する
- アップロードまたは生成された画像をテキストプロンプトで編集する
- 特定のオブジェクト(ハンドバッグや靴など)でモデルをファインチューニングし、画像を生成する
2024年6月現在、Imagen を使用するためには、申請フォームからの申請が必要となります。現在の Imagen 2 が「Generally Available with allowlist(許可リスト付きの一般公開)」という、制限付きの公開であるためです。
詳細は以下のドキュメントをご参照ください。
Imagen の利用申請は、以下の申請フォームから行ってください。
Gradio
Gradio は、機械学習 Web アプリを容易に構築できる Python フレームワークです。
当記事では、Gradio の Interface() クラスを使用して web アプリを構成しています。
当記事で開発するもの
本記事では、以下を機能を持つ Web アプリケーションを開発しました。
- Imagen 2 に対してパラメータ(サイズやアスペクト比など)をセットしてリクエストを投入し、画像を生成する
- 日本語のテキストプロンプトを受け付ける
- UI は日本語で表示する
一方で、以下は要件としていません。
- アップロードした画像をプロンプトとして別の新しい画像を生成する
- 画像の一部を編集する(マスキング等)
- 特定の画像を使ってファインチューニングする
ソースコードは、Google Cloud が提供する以下の GitHub リポジトリのソースコードを元にし、一部改変しています。ソースコードは Apache 2.0 ライセンスに基づいて公開されています。
ソースコードの開発
Python のバージョン
当記事では、Python 3.12.0 を使って開発しています。
$ python --version
Python 3.12.0
requirements.txt
使用するライブラリを、以下のとおり requirements.txt に定義します。
gunicorn
google-cloud-aiplatform==1.52.0
google-generativeai==0.5.4
gradio==4.36.0
main.py
開発したコードの全文を以下に記載します。
- 変数
PROJECT_IDに定義するYour-Project-IDの部分は、ご自身が使用する Google Cloud プロジェクトの IDに置き換えてください。 - ライセンス規約に基づき、改変部分が判るようにコメントを追加しています。
# Copyright 2023 Google LLC
#
# Licensed under the Apache License, Version 2.0 (the "License");
# you may not use this file except in compliance with the License.
# You may obtain a copy of the License at
#
#     https://www.apache.org/licenses/LICENSE-2.0
#
# Unless required by applicable law or agreed to in writing, software
# distributed under the License is distributed on an "AS IS" BASIS,
# WITHOUT WARRANTIES OR CONDITIONS OF ANY KIND, either express or implied.
# See the License for the specific language governing permissions and
# limitations under the License.


import gradio as gr
import traceback
import vertexai
from vertexai.preview.vision_models import ImageGenerationModel

# 環境変数の設定
PROJECT_ID = "Your-Project-ID"  # Google Cloud プロジェクトの ID
LOCATION = "us-central1"  # Gemini モデルを使用するリージョン

vertexai.init(project=PROJECT_ID, location=LOCATION)


def imagen_generate(
    model_name: str,
    prompt: str,
    negative_prompt: str,
    sampleImageSize: int,
    aspect_ratio: str, # アスペクト比を指定できるように追加
    sampleCount: int,
    seed=None,
):
    model = ImageGenerationModel.from_pretrained(model_name)

    generate_response = model.generate_images(
        prompt=prompt,
        negative_prompt=negative_prompt,
        number_of_images=sampleCount,
        guidance_scale=float(sampleImageSize),
        aspect_ratio=aspect_ratio, # アスペクト比を指定できるように追加
        language="ja", # 日本語でのプロンプトに対応するために追加
        seed=seed,
    )

    images = []
    for index, result in enumerate(generate_response):
        images.append(generate_response[index]._pil_image)
    return images, generate_response


# Update function called by Gradio
def update(
    model_name,
    prompt,
    negative_prompt,
    sampleImageSize="1536",
    aspect_ratio="1:1", # アスペクト比を指定できるように追加
    sampleCount=4,
    seed=None,
):
    if len(negative_prompt) == 0:
        negative_prompt = None

    print("prompt:", prompt)
    print("negative_prompt:", negative_prompt)

    # Advanced option, try different the seed numbers
    # any random integer number range: (0, 2147483647)
    if seed < 0 or seed > 2147483647:
        seed = None

    # Use & provide a seed, if possible, so that we can reproduce the results when needed.
    images = []
    error_message = ""
    try:
        images, generate_response = imagen_generate(
            model_name, prompt, negative_prompt, sampleImageSize, aspect_ratio, sampleCount, seed # アスペクト比を指定できるように追加
        )
    except Exception as e:
        print(e)
        error_message = """An error occured calling the API.
      1. Check if response was not blocked based on policy violation, check if the UI behaves the same way.
      2. Try a different prompt to see if that was the problem.
      """
        error_message += "\n" + traceback.format_exc()
        # raise gr.Error(str(e))

    return images, error_message

# gradio の設定
iface = gr.Interface(
    fn=update,
    inputs=[
        gr.Dropdown(
            label="使用するモデル",
            choices=["imagegeneration@002", "imagegeneration@006"], # 最新モデルを使用する用に修正
            value="imagegeneration@006", # 最新モデルを使用する用に修正
            ),
        gr.Textbox(
            label="プロンプト入力", # 日本語での表示に修正
            # 日本語での説明文章に修正
            placeholder="短い文とキーワードをカンマで区切って使用する。たとえば「昼間, 上空からのショット, 動いている鳥」など",
            value="",
            ),
        gr.Textbox(
            label="ネガティブプロンプト", # 日本語での表示に修正
            # 日本語での説明文章に修正
            placeholder="表示したくない内容を定義します",
            value="",
            ),
        gr.Dropdown(
            label="出力イメージサイズ", # 日本語での表示に修正
            choices=["256", "1024", "1536"],
            value="1536",
            ),
        gr.Dropdown(
            # アスペクト比を指定できるように追加
            label="アスペクト比", # 日本語での表示に修正
            choices=["1:1", "9:16", "16:9","3:4", "4:3"],
            value="1:1",
            ),
        gr.Number(
            label="表示件数",  # 日本語での表示に修正
            # 日本語での説明文章に修正
            info="生成される画像の数。指定できる整数値: 1~4。デフォルト値: 4",
            value=4),
        gr.Number(
            label="seed",
            # 日本語での説明文章に修正
            info="必要に応じて結果を再現できるように、可能であればシードを使用してください。整数範囲: (0, 2147483647)",
            value=-1,
        ),
    ],
    outputs=[
        gr.Gallery(
            label="Generated Images",
            show_label=True,
            elem_id="gallery",
            columns=[2],
            object_fit="contain",
            height="auto",
        ),
        gr.Textbox(label="Error Messages"),
    ],
    title="Image Generation with Imagen on Vertex AI", # タイトルの修正
    # 日本語での説明文章に修正
    description="""テキストプロンプトからの画像生成。Imagen のドキュメントについては、この[リンク](https://cloud.google.com/vertex-ai/docs/generative-ai/image/generate-images)を参照してください。 """,
    allow_flagging="never",
    theme=gr.themes.Soft(),
)

# Local 起動
iface.launch()
動作確認
ローカルでの実行
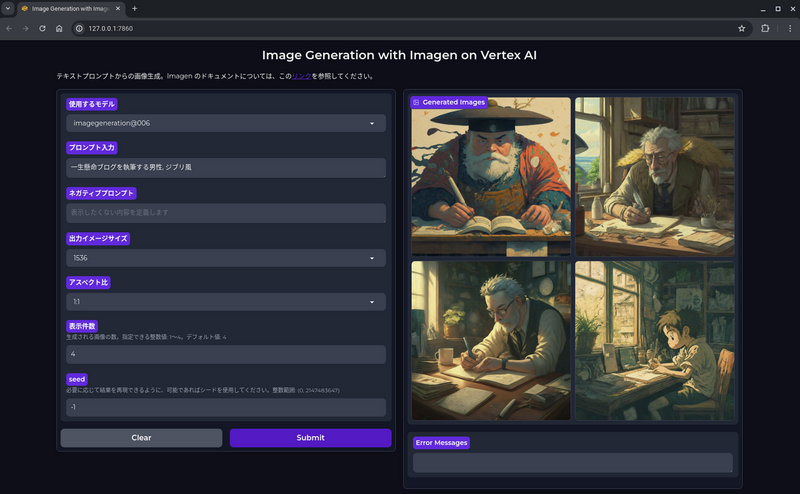
以下のコマンドにより、ローカルホスト(127.0.0.1)のポート 7860 で Web アプリが起動します。
$ python3 main.py
Running on local URL:  http://127.0.0.1:7860
画像生成 Web アプリを使用した画像生成
ローカルで起動した Web アプリの URL(http://127.0.0.1:7860)にブラウザでアクセスして、画像生成 Web アプリに接続します。
画像生成 Web アプリの UI から適当なテキストプロンプトを送信(Submit)してみます。送信(Submit)したテキストプロンプトの後に、Imagen モデルが生成した画像が表示されます。
画像生成におけるプロンプトの開発指針は、以下の Google Cloud 公式ドキュメントもご参照ください。
- 参考 : プロンプトと画像属性のガイド
Google Cloud へのデプロイ
Cloud Run の使用
開発した画像生成 Web アプリを、Google Cloud 上にデプロイします。当記事ではデプロイ先のサービスとして、サーバーレス コンテナ コンピューティングサービスである Cloud Run を使用します。Cloud Run の詳細については以下の記事をご一読ください。
ディレクトリ構成
今回開発した画像生成 Web アプリのディレクトリ構成は以下のとおりです。
imagen-app
|-- main.py
|-- requirements.txt
|-- Dockerfile
コードの修正
main.py 末尾の launch() の引数を、以下のように修正します。
iface.launch(server_name="0.0.0.0", server_port=10080)
Dockerfile の作成
Cloud Run へのデプロイには Docker イメージを用意する必要があるため、Dockerfile を作成します。
FROM python:3.12-slim
WORKDIR /usr/src/app
COPY requirements.txt ./
RUN pip install --no-cache-dir -r requirements.txt
COPY . .
EXPOSE 10080
CMD [ "python", "./main.py" ]
Cloud Run にデプロイ
Dockerfile の存在するディレクトリで以下のコマンドを実行し、コンテナイメージのビルドと Cloud Run へのデプロイを同時に行います。
# Cloud Run サービスをデプロイ
$ gcloud run deploy gradio-imagen --source . \
--region=asia-northeast1 \
--allow-unauthenticated \
--port 10080 \
--memory=1Gi \
--min-instances=1 \
--max-instances=1
ビルドされたコンテナイメージは、指定したリージョンに自動で作成される「cloud-run-source-deploy」という名前の Artifact Registory リポジトリに格納されます。
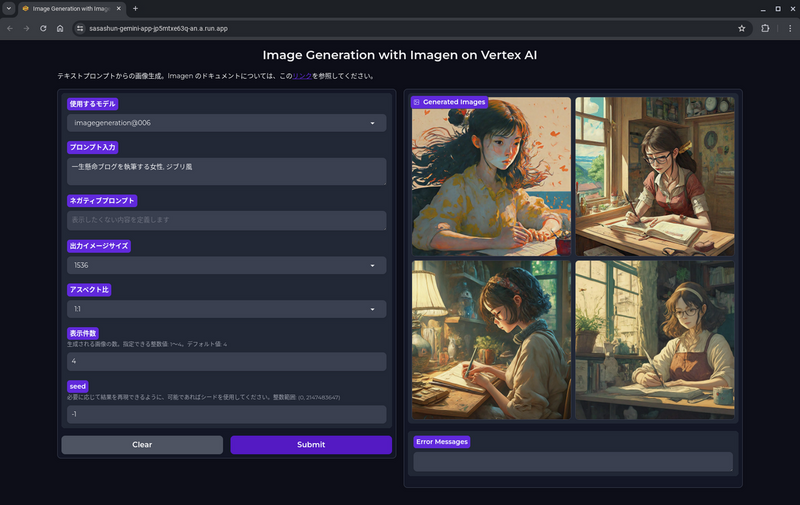
動作確認
Cloud Run のデプロイが完了すると、標準出力に Cloud Run のエンドポイントが Service URL として出力されます。この URL に、ブラウザからアクセスします。
$  gcloud run deploy gradio-imagen --source . --port 10080 --region=asia-northeast1 --allow-unauthenticated --memory=1Gi --min-instances=1 --max-instances=1
This command is equivalent to running `gcloud builds submit --pack image=[IMAGE] .` and `gcloud run deploy gradio-imagen --image [IMAGE]`

Building using Buildpacks and deploying container to Cloud Run service [gradio-imagen] in project [Your-Project-ID] region [asia-northeast1]
✓ Building and deploying... Done.
  ✓ Uploading sources...
  ✓ Building Container... Logs are available at [https://console.cloud.google.com/cloud-build/builds/34c8fdeb-02c3-469d-b6ed-9b589d64d759?project=858711621705].
  ✓ Creating Revision...
  ✓ Routing traffic...
  ✓ Setting IAM Policy...
Done.
Service [gradio-imagen] revision [gradio-imagen-00002-frp] has been deployed and is serving 100 percent of traffic.
Service URL: https://gradio-imagen-XXXXXXXXX-an.a.run.app
ローカルで実行したときと同様に、Web アプリの UI にテキストプロンプトを送信(Submit)してみます。
Cloud Run のアクセス元制御について
Cloud Run にデプロイした Web アプリのアクセス元制御を行いたい場合、Cloud Run の前段にロードバランサーを配置し、Identity Aware Proxy(IAP)による IAM 認証や Cloud Armor による IP アドレスの制限を実装することができます。
以下の記事もご参照ください。
大津 和幸 (記事一覧)
クラウドソリューション部
2022年4月にG-gen にジョイン。
前職まではAWSをはじめインフラ領域全般のなんでも屋。二刀流クラウドエンジニアを目指して、AWSのスキルをGoogle Cloudにマイグレーション中の日々。